Home Blog Page 20

Fix ‘DNS Probe Finished No Internet’ Error

0

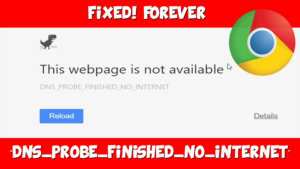
Here, I explain to fix “DNS PROBE FINISHED NO INTERNET” Error and also using best method to solve this problem like ‘DNS Probe Finished No Internet’ error while trying to browse the internet which was very frustrating and was not much of help online and DNS issue and I fixed the “Dns_Probe_Finished_No_Internet” issue just by changing the automatically obtained DNS servers to Open DNS and also solutions provided by me and other experts to fix the error in your Windows Computer that is best all time see below Method.

Fix ‘DNS Probe Finished No Internet’ Error

DNS Probe Finished No Internet’

#1: Command Prompt

Step 1: Open windows command prompt.

Step 2: After type in or copy and paste the following code like netsh winsock reset.

Step 3: Press Enter.

Step 4: Then restart your computer.

Step 5: Done.

#2: DNS Address to Open DNS

Step 1: My PCs automatically obtained DNS server addresses to Open DNS.

Step 2: Right click on your network icon from windows task bar.

Step 3: After then click on Network and Sharing Center.

Step 4: See for Local Area Connection and click on it.

Step 5: After New window click on ‘Properties’.

Step 6: Select Internet Protocol Version 4.

Step 7: After hit Properties.

Step 8: After new window select the radio button that says Use the following DNS server addresses.

Step 9: After preferred DNS server box type in 208.67.222.222.

Step 10: After Check the box that says Validate settings upon exit.

Step 11: After then clicks OK.

Step 12: Done.

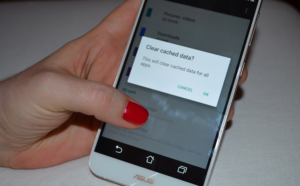
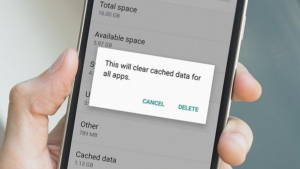
#3: Clear Cache after Reinstall

Now, What Is Cached Data? See this after click on the Customize and control button from the top right corner and then click on Settings after Scroll down and click on Show Advanced Settings and clear the cache in Mozilla Firefox that is best all time to fix: DNS Probe Finished No Internet error.

#4: Uninstalling Any Website Filtering Software

Now using websites filtering software then you should disable it or uninstall it and done after then try to browse those websites that you were getting error from that is main thing considered for you.

Here, completed information regarding for this topic like Fix ‘DNS Probe Finished No Internet’ Error and you read this guide after very easy solution for this Dns_Probe_Finished_No_Internet Problem. please check speedcheck.org  if you like to check internet speed.

What Is Cached Data?

0

Here, many users say to one question to what Cached Data is and how to clear Cached Data and make and receive calls and phone connect to the internet use cached data in one form or another.

What Is Cached Data?

What Is Cached Data?

Here simple meaning for what is cached data and you visit a place for the first time and after decide to this same visit other time fast that is cached data. Device visits a website or uses an app and certain data is stored in the form of cache in the device memory and after Next time when the device accesses the same web site and cached data that was stored when the website was visited the first time that called Cached Data.

How to Clear Cached Data on Android Device

Clear Cached Data on Android Device is related to the system and the system files so that your Android phone and the steps for clearing the cache partition see below guide.

How to Clear Cached Data on Android KitKat Version

What Is Cached Data? 

Step 1: Switch off your Android KitKat device.

Step 2: Press and hold the Volume Down button.

Step 3: Press the Power key.

Step 4: Continue to press the Volume Down key.

Step 5: After Recovery by using the Volume down key.

Step 6: After use your Power key to confirm.

Step 7: See a triangle icon and after press the Volume Up key and the Power key.

Step 8: Use the Volume Down key to highlight Wipe Cache Partition and use your Power key to confirm your selection.

Step 9: After cache partition has been deleted after use your Power key to choose the option Reboot System Now.

Step 10: Done.

How to Clear Cached Data on Android Marshmallow Version

Step 1: Switch off your Android Marshmallow.

Step 2: Press and hold the Power and Volume button.

Step 3: help of the Volume keys and use the Power key to confirm your selection.

Step 4: When the screen shows the Android bot on then press the power and volume key together just once and you will be on the Recovery menu.

Step 5: Use the Volume keys once again to highlight Wipe Cache Partition.

Step 6: Use the Power key to select the highlighted option.

Step 7: Cache has been deleted.

How to Clear All Apps Cached Data for android

Step 1: Go to Settings menu.

Step 2: Now, pulling down the notification shade and tapping on the gear icon on the top.

Step 2: See for storage and tap on.

Step 3: After tap on Cached Data.

Step 4: Pop-up screen which will ask for confirmation.

Step 5: Tap on OK.

Now, completed guide for what is Cached Data? And solve your problem like what is cached data see above guide very helpful for you.

How to download iTunes for windows 10

0

Here, download iTunes for windows 10 and also available free any time and iTunes is a free application for Mac and PC and plays all your digital music and video and it’s an entertainment superstore that is best all time.

Download iTunes for windows 10

download iTunes for windows 10

Step 1: Go to Your Browser.

Step 2: After Navigate apple.com/iTunes/download.

Step 3: Click Download now button.

Step 4: After Click Save.

Step 5: Wait because iTunes now download.

Step 6: After Run when the Download is complete.

Step 7: Next.

Step 8: Click Install.

Step 9: Done.

Now, follow above steps to Completed and Easy way to download iTunes for windows 10.

How to add your media library into iTunes on Windows 10

download iTunes for windows 10

Step 1: Now, Launch iTunes from your Start menu and taskbar or desktop.

Step 2: After Click File.

Step 3: Click Add Folder to Library.

Step 4: Choose folder you like to import into iTunes.

Step 5: Click Select Folder.

Step 6: Done.

Iphone: How to download iTunes

download iTunes for windows 10

Now, these Steps for Iphone User How to download iTunes and you can follow below Steps.

Step 1: Open the App Store App.

Step 2: After Tap Search.

Step 3: Type ITunes Store in the Search Field.

Step 4: Tap iTunes Store.

Step 5: Tap GET.

Step 6: Tap install.

Step 7: Done.

Now, completed for Steps for How to download iTunes and you follow above Steps.

ITunes Features

  1. Organize your music into playlists.
  2. Edit file
  3. Record compact discs.
  4. Copy files to an iPod.
  5. Purchase music and videos on the Internet.
  6. Run a visualize to display graphical effects.
  7. Download iTunes for windows 10 available 32 and 64 bit versions.

Now Completed download iTunes for windows 10 and other thing for How to install iTunes in you Iphone all easy steps follow above guide that is best all time.

How to Block No Caller ID on Iphone

0

How to block no caller id on iphone this is best for all iphone users and IOS Features allows us to block a specific phone number from our contacts and you see below guide to solve question for how to block no caller ID on Iphone on iphone.

How to Block No Caller ID on Iphone

Here, some feature to block unknown and No Caller ID on my iPhone as I created a contact called Unknown and No Caller ID and after then add them to the blacklist and this is work very easy on iphone.

How to Block No Caller ID on Iphone

How to Block No Caller ID on Iphone

Now, show below steps to help you Block No Caller ID on Iphone and you can silence calls after alerts and notifications that you get while your device is locked that is best all time.

Step 1: Open Setting app.

Step 2: Select Do Not Disturb.

Step 3: Turn on Do not disturb by toggling on the Manual option.

Step 4: you all see the half moon icon in the status bar.

Step 5: This icon indicates that you are currently in Do Not Disturb mode.

Step 6: Select Allow Calls From and choose All Contacts.

Step 7: Now, just open the Control Center and tap on the half moon icon.

How to Block No Caller ID on Iphone

Method 2 (Using Contacts)

Create a new contact and after you may name this new contact “No Caller ID”. See below.

Step 1: Launch the Phone app.

Step 2: Tap Contacts.

Step 3: Tap the + button.

Step 4: As phone number, enter 000-000-0000.

Step 5: Done.

After, Block No Caller ID popup will say you will not receive phone calls and messages then tap Block Contact that is best all time.

Now here we are going to install a free app from the App Store called TrapCall and you see below some Features of TrapCall.

  1. Find hiding behind NO CALLER ID, Unknown & Blocked Calls.
  2. After you need to file a police report.
  3. Track down digital stalkers.
  4. Protect your privacy and safety.
  5. Unwanted calls stop.
  6. Record your incoming phone calls.
  7. Avoid needing to change your number.
  8. Get your voicemails to you.

Now, finished guide for this How to Block No Caller ID on Iphone and you read this guide very helpful for you.

How To Set Up S Pen On Your Galaxy Note 8

0

The recently Samsung has a released their latest flagship phone Galaxy Note 8. This one is amazing featuring to getting a real adventure feels and also to the one of the advanced feature in S pen to introduce in note 8. S Pen is lot’s of changes with new patterns and well customized to the way you want it to work and feels. So let’s check out how to set up the S Pen on Galaxy Note 8.

How To Set Up S Pen On Your Galaxy Note 8

Steps To Set Up The S Pen On Galaxy Note 8

How To Set Up S Pen On Your Galaxy Note 8

On your Home Screen, you would have to go to Apps.

Look for Search and here look for ‘S Pen’

There is extended lots of things that have you. There are four types in the S Pen page – ‘General’, ‘Air Command’, ‘Removal’ and finally ‘Feedback’. In the ‘General’ section you will get the below options.

  • Air View: you can toggle it on or off
  • Direct Pen Input: you can turn this feature on or off. The feature is simply to swap from the keyboard to S Pen while you are filling out form fields.
  • Pointer: just toggled on or off. Whenever you hang around your S Pen quite close to your Galaxy Note 8 a stick will appear on the screen if the feature is on. There are some items over which if the pointer hangs around will disclose what it does or what it is.
  • Screen Off Memo: In the last one is to be toggled on or off. When this setting is on the user can create notes by pressing the button of the S Pen and then writing on the Note 8 screen even when it is off.

In order to set up the S Pen on Galaxy Note 8, you will get the below options under ‘Air Command’:

  • Shortcuts: you can add or remove shortcuts for apps and clicking on small icon arrow pointing to the left go back to the same screen to proceed with the setup.
  • Floating Command: You can have this command on or off

Below the ‘Removal’ section you will find the under options which you can customize to set up the S Pen on Galaxy Note 8:

  • When S Pen is removed: Here You can get four options in this part to what the smartphone should do when you remove the S Pen on your Galaxy Note 8 –Open Air Command, Create Note or Do Nothing. Pick one according to your preference.
  • Alarm: You can toggle this feature on or off. This one is an amazing feature and if turned on your Note 8 will sound an alarm if you put down behind your S Pen and walk away without inserting it in your phone.
  • Power Saver: And in last, this one which can be toggled on or off. You can save battery by turning on this feature because the phone doesn’t discover the S Pen when it is inserted in it.

In the Last Section is ‘Feedback’, they give you two options:

  • Sound: Toggle it on or off. When the S Pen is removed or inserted or written with it there will be a sound played.
  • Vibration: If you toggle it on your smartphone will vibrate every time you remove or insert your S Pen. If you don’t like the feature turn it off.

Hope this above guide will help you to set up the S Pen on Galaxy Note 8 after which using your S Pen along with your Note 8 would be a wonderful experience.

How Much Data Does Netflix Use?

0

Here, guide for How Much Data Does Netflix Use for streaming movie or shows and this thing how to control Netflix data usage that is some question solve see below tips.

Now running more problem is sometimes video streaming could be costly because some people limit their services in order to prevent their bill to be bigger than ever, people have limited access to fast internet that is considered to the Netflix Use.

Netflix has different solution that will help understand data rate on Netflix and after higher the resolution and video quality is the more data you use and logical moment because high-quality videos are big and here shows you ways to find out how much data does Netflix use while you watch your favorite movies.

How Much Data Does Netflix Use?

how much Data Does Netflix Use              

Watching TV shows or movies on Netflix uses about 1 GB of data per hour for each high quality definition video and after 3 GB per hour for each stream of HD video after you are concerned with data caps or bandwidth limits after you can adjust your data usage settings that are best.

  1. Open settings
  2. Go to cellular option.
  3. You click it you have to scroll down to Netflix.
  4. Check your data
  5. You will be able to see all the data that this particular app has consumed until then from the mobile networks.
  6. It is important to understand that your data amount is only for your 4G and cellular usage and not other Wi-Fi connections.
  7. If you scroll to the bottom you will be able to click Reset Statistics.
  8. After Last Reset that you will be able to see how much data is used by then.

Here, see above very easy problem solve to how much Data Does Netflix Use other devices.

How to Check Your Netflix Data Use on iPhone

how much Data Does Netflix Use

Netflix Watching various TV shows and movies and we not how much data does we are using on our iPhone or iPad and how to check that data see below steps to easy for how much Data Does Netflix Use on Iphone.

  1. Got to iPhone’s Settings
  2. Tap Cellular.
  3. Go down and find Netflix.
  4. If you want that Netflix never uses Cellular data, switch it off.
  5. Done.

Data usage settings only apply to the Netflix profile you set them from that called for meaning you can have different data usage settings for each profile and total amount of data that Netflix uses make sure to change this setting for each profile that is best all time.

Now completed guide for how much Data Does Netflix Use?    And you read this guide very helpful for you.

How to Unblock Games at School

0

Here, I explain to how to Unblock Games at School and Games are the most important part of entertainment but unblock games at school is difficult because school authority not allows playing Games during the School time.

There are Massive games which are usually played by students but sometimes in school when these games blocked on a computer network after you get the message as Access Denied that is blocked network on the School.

Now find some free unblock games website which allows you to play games like 4th and Goal, Run 3, Super Mario Flash 2 and many more and after you see Below guide for how to unblock games at school to play free unblocked games online that is best thing for all time.

How to Unblock Games at School

1. IP Address

Now sometimes blocked websites are stored as a list of URLs and using the IP address instead of the URL might sometimes work and you IP address keep changing so you may have to repeat the process and there are also websites who block users from visiting them via IP address.

How to find the IP Address of a Site

  1. Visit a website which provides service to find the IP address.
  2. Type the URL of the website or web page you want to visit.
  3. Click on Find IP.
  4. Highlight the IP address.
  5. Right click on the highlighted IP address.
  6. Choose Copy or Go to.

Using Mac OS X Terminal

Step 1: Open the Mac Terminal.

Step 2: Type the following command and press Enter.

Step 3: You don’t need to part of the web address.

Step 4: Group of numbers you will see is the IP address of the website.

Step 5: After play the unblock games.

Step 6: Done.

2. Virtual Private Network

Now VPN is a network technology that allows you to create a secure connection to another network over the Internet and VPN can be used to access region-restricted websites and many more and many paid and free VPN services and apps for Android and iPhone using best Unblock Games after Free to Play.

How to Enable VPN in Opera

Opera called the best battery saver and free VPN with unlimited VPN data.

Step 1: Download the Opera browser.

Step 2: Open Opera.

Step 3: Click on Menu left side.

Step 4: Click on Settings.

Step 5: Open Privacy.

Step 6: Check Enable VPN.

Step 7: You click on the VPN icon.

Step 8: Done after Play free Unblock Games.

These are the simple methods to unblock the websites and play online unblock games at school And best thing considered for is a risk of being expelled from school and you will be able to play free unblocked games all time.

Now completed guide for How to Unblock Games at School and you read this guide very helpful for you.

Top PS4 & Xbox One Fallout 4 Mods

0

Fallout 4 Mods are available for Xbox One and PlayStation 4 and Fallout 4 is backed by an extensive modding community and the Fallout 4 mods marketplace is full of options for your console of choice and after some new update on board your console and you all get access to a growing catalog of mods and Bethesda’s catalog now features over 11,000 Fallout 4 mods and this huge number of Fallout 4 Mod.

Best PS4 & Xbox One Fallout 4 Mods

See below best Fallout 4 mods and noting that PS4 Fallout 4 mods are far more limited than Xbox One mods because PS4 mod developers not use external that is best.

1. PIP-Pad (Xbox One Fallout 4 mods)

PIP-Pad are tired of looking at the same old Pip-Boy every time you play you all want to take a look at this Fallout 4 mod for Xbox One and not available for PS4 and also PIP-Pad swaps out the Sole Survivor Pip-Boy for a pad that works exactly like the Pip-Boy does only it looks a whole lot different and PIP-Pad stands for Personal Information Processor and it’s based on an actual item in the Fallout universe.

2. Subway Runner (fallout 4 mods)

Subway Runner fallout 4 mods is a unique Fallout 4 mod that connects most of the subway stations around the Commonwealth and this mod crates a vast network of subway tunnels that connect various subway stations across the map and some type Station added for the Game and after Subway Runner fallout 4 mods tunnels are not just filled with debris and train wrecks and you all encounter various Ghouls, Raiders, Super Mutants and Synths and you all able to move quickly from one place to another that is best all time.

3. Constructible Guards (Fallout 4 mod)

Constructible Guards is a brand new Fallout 4 mod that allows you to construct your very own guards to protect the settlements in your fold and now you can construct Brotherhood of Steel, Minutemen, Institute, Railroad and Lyon Pride to guard your property for this fallout 4 mods and after Fallout 4 Mods are not available for Ps4 is not PS4 mods and also available for Xbox One it is also Fallout 4 Xbox one.

4. Glowing Animals Emit Light (simple Fallout 4 mods)

Glowing Animals Emit Light is a simple Fallout 4 mod that adds a light source to creatures that glow in the dark and bigger the creature and the brighter the light and it is going to give off a brilliant light that makes it a whole lot easier to fight and this available for Fallout 4 mods are available both for PS4 and Xbox One.

5. Dino’s Decorations

Dino’s Decorations adds a ton of clutter arrangements for your various settlements and like decorating and this Fallout 4 mod adds some neat looking static items for your settlements including kitchenware and lab tools and you add them to a surface and your character not is able to knock them around that is best.

6. Settlement Borders Extended

Settlements Borders extended other essential Fallout 4 mods and expands the size of the various vanilla settlements in the game and with this installed them are about six times the size freeing up precious space for you to build.

Now completed Guide for Best PS4 & Xbox One Fallout 4 Mods and read this guide helpful finding you best Fallout 4 Mods.

AirShou Download for Android & IOS

0

AirShou is a screen recording app developed and AirShou is also available for iOS 9 and also APK version for android is also available of this app. AirShou popular for recording high definition videos. Best part of this iOS screen recorder is that it not requires a jailbroken device to run that is best all time.

AirShou

AirShou was taken down by the developers and it has been recently re-released for iOS 10 with some major updates in its functionality that allows it to consume less device capacity and processing power and return HD recording that is best all time.

Features of AirShou

  1. Can be comfortably used on iPhone.
  2. Records high definition 1080px with an amazing 60fps rate.
  3. Available for Android.
  4. Can be also used on PC/Windows by using an emulator.
  5. Records an amazing voice quality.
  6. Requires no jailbreak.
  7. Easy to Use.

How to Download AirShou for Android

Step 1: Download AirShou APK File.

Step 2: After Go to your device settings -> security -> app configuration – > allow installation from “unknown sources”.

Step 3: Open the APK installer.

Step 4: Follow the screen and install the android Apk.

Step 5: Done.

How to Download AirShou for IOS

Step 1: Download AirShou IPA File.

Step 2: Open the .plist file.

Step 3: After go the installation.

Step 4: After complete the install process.

Step 5: Open the app from main-menu.

Step 6: Just click the red button and start recording in HD.

Step 7: Done.

Now completed guide for AirShou Download for Android & IOS and you read this guide very helpful for you.