applications on the Windows platform are very mature, but it is regrettable that some very useful mobile applications have not been on the Windows platform. But if the app works on Android, then the good news is coming. With the help of third-party software, you can run it on a Windows computer.
However, running an Android app on a PC can be more complicated than installing a Windows app directly. In this article, we will provide you with detailed instructions for running Android apps on Windows computers.
Android app on your computer
Android emulator and how to use it
One way to run an Android app on a Windows computer is to use the Android emulator. Simulators are written in fairly complex code, but their basic concepts are not hard to understand: let your computer simulate how another device type works. Specifically, the Android emulator will make your Windows computer run like an Android device.
As a hardware medium, the Android emulator provides the application with the memory, processing performance, and storage space needed to run on a Windows machine. They also map the hardware of the Android device to the computer peripherals, you can hear the sound and music of the app through the speakers, and the chat application of Skype can recognize the computer’s microphone and camera.
In fact, computers running Android apps may perform better than phones or tablets, but it depends on the hardware you use.
But the biggest advantage of Android emulators is that they work like normal Windows apps. You can run them from the system desktop or the start menu and move the window or resize it at will.
Bluestacks
The Bluestacks App Player is one of the most powerful Android emulators available today. Its personalized interface design makes it easy to set up and run the switch simulator. The so-called Layercake technology can use hardware accelerators to improve the performance of Android games in Windows.
It’s worth noting that while Bluestacks is free, users can get premium support and more features with a paid subscription ($2/month).
Hardware configuration requirements
- 2GB RAM
- 4GB disk space
- DirectX 9.0 or higher
Installing Bluestacks is very simple and is no different from other Windows applications. You need to download the installer from the official website of Bluestacks, then run the installer and choose where to store the application and data files. Unfortunately, the installation directory for Bluestacks cannot be changed. It can only be installed on the boot disk of your computer.
special function
Bluestacks has some unique controls that are different from other Android emulators.
The control sidebar on the left side of the interface provides most of the control functions you need, such as changing the orientation of the window, the screenshot tool, and the shortcuts for the file transfer application (copying files from the desktop to the virtual storage space of the Bluestacks).

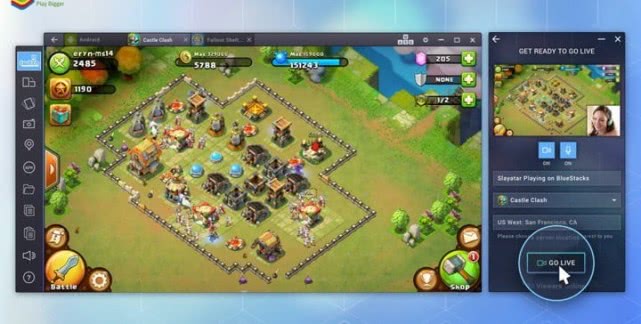
Bluestacks also has its own streaming platform, Bluestacks TV. If you have a Facebook or Twitch account and your computer has more than 8GB of RAM, you can stream apps and games directly from the Bluestacks window. The Bluestacks app lets you calibrate connected microphones, connect cameras, preview screen content before live streaming, or respond to Facebook comments or Twitch messages from a pop-up window. You can also watch other people’s live broadcasts via Bluestacks, or browse through the generated game list based on the installed app.
Bluestacks also provides plug-and-play support for gamepads. When you plug a wireless/wired Xbox controller into your PC, or match a Bluetooth handle, Bluestacks will also recognize it.
Bluestacks AppCast allows you to run games and apps on your phone, but you need to install the AppCast app on your phone and then log in with your Google credentials. Once you’re ready, you can see a list of apps on your phone and click on one to run them on your computer.
DuOS
DuOS is an Android emulator developed by American Megatrends Incorporated. The majority of Windows users will not be unfamiliar with this company, and the BIOS firmware used by millions of Windows computers is exactly what they developed.
Like Bluestacks, DuOS can run Android Marshmallow in window mode, but it offers a much less personalized experience. You need to go to the Android settings menu to adjust most of the options. If you want to bypass Google Play to install the application, you must first download the installation file to the PC, right click on the file, and select “Apply to DuOS”.
But compared to native Android, DuOS is not without its own advantages. It has shortcuts for rotating the screen, zooming in, sliding and tilting, as well as peripherals such as microphones and cameras. You can also set up a folder for data analysis between Windows and DuOS applications, as well as the amount of RAM used by DuOS, in case it affects the performance of the system itself.
DuOS is a paid app that costs $10, but it offers a 30-day free trial.
The hardware configuration requirements for DuOS are as follows:
1. Intel x86 processor
2. BIOS supports and starts hardware virtualization technology
3.OpenGL 3.0
4.2GB RAM, but recommended for 3GB RAM
5.2GB disk space
Google Chrome
If you don’t want to be so troublesome, Google’s Chrome browser will also let you run Android apps on Windows computers. In 2014, Google launched Android Runtime for Chrome, a compatibility layer and sandbox technology for installing Android apps on a computer. It runs Android apps at a speed comparable to the original.
Unfortunately, Android Runtime for Chrome does not support all Android apps, and converting the app to a format that ARC can understand is a daunting task. In addition, applications that rely on third-party services — such as Google’s Gmail client — also don’t work.
However, ARC is probably the most lightweight Android emulator, and it’s the easiest to install – as long as you have the Chrome browser installed on your computer, you can use it immediately.
How to install an Android app in Chrome
ARC is designed for Google Chrome OS. To get it to work on Windows, you need to download the third-party tool ARChon Custom Runtime. In addition, your Chrome version must be above 37.
1. Download and unzip the ARChon Custom Runtime.
2. Go to Menu > More Tools > Extensions.
3. Check the developer mode in the upper right corner of the page.
4. Select the folder containing ARChon.
Once you find the app you want to install, follow these steps to install it:
1. Unzip the file.
2. Open the extension page in Chrome.
3. Click on “Load unzipped extensions”.
4. Select the folder containing the application.
5. To run the app, you can find it in the extensions page.
Since ARC does not support a large number of applications, if you want to install an application that is not on the support list, you can repack it with a small tool called chromeos-apk. Although the process is a bit complicated, it works for most Android apps that don’t rely on native Android or Google services.
How to convert Android apps using chromeos-apk:
1. Download the installation file.
2. Install node.js.
3. Open the Windows command line in the download folder and type npm install chromeos-apk -g to complete the installation of chromeos-apk.
Then you need to download the app’s apk file and run it via chromeos-apk. To do this, open the command line in the folder where you placed the installation file, then type chromeos-apk [APK file name] and hit enter.
You may be asked to provide the package name of the app. The easiest way to get it is to look at the URL of the app in the Play Store and find the content after “?id=”, which is the package name of the app. For example, Evernote’s package name is “com.evernote”
Once you’ve finished modifying your application, you can install it in Chrome by following the steps above.
Dual system boot
In addition to the Android emulator, there is a way to get a newer version of Android, but the steps are a bit more complicated, it is to install dual systems. This method can turn your computer into an Android device, and the system runs almost the same as on the phone/tablet. At boot time, you can choose whether to start Android or Windows.
Installing a dual system is more complicated than installing a native Android system. Because the computer hardware of the processor, graphics card, and hard drive must be added to Android by third-party developers, you need to find a custom version that supports your PC’s hardware configuration.
Remix OS
Remix OS is an Android-based desktop operating system. Its interface style is similar to that of Windows and Chrome OS, but it runs almost all Android apps.
Remix OS also fully supports keyboards and mice, and the redesigned Android taskbar allows you to easily switch between apps running in the background. It also provides a number of useful tools such as screenshots and file management.
The general dual-system version of Android needs to be reinstalled when upgrading, but Remix OS supports OTA upgrades. In other words, you can check and install the system upgrade from the setup menu as you would on a mobile phone.
But it’s worth noting that the system version of Remix OS is not the latest Nougat, but Marshmallow, which also does not support every PC configuration.
Hardware configuration requirements:
8GB USB 3.0 flash drive with FAT32 support and a minimum write speed of 20MB/s
How to install Remix OS:
1. Download the Remix OS for PC package, which contains all the files you need.
2. Run the Remix OS installation tool. Follow the instructions to install Remix OS for PC on your computer’s hard drive.
3. Restart your computer. If your computer has UEFI boot enabled, make sure that Safe Boot is turned off.
4. Select Remix OS from the Windows boot menu.
If you want to save hardware space, or if you want to take Android with you, you can install Remix OS on a USB flash drive. However, the U disk you use must support USB 3.0, the available space is above 8GB, and the write speed is above 20MB/s.
How to install Remix OS on a USB flash drive
1. Download the Remix OS for PC package.
2. Insert the USB flash drive into the PC.
3. Run the Remix OS installation tool and follow the instructions to install it.
4. Restart your computer. If your computer has UEFI boot enabled, make sure that Safe Boot is turned off.
5. Select “USB Storage Device” in the startup item.
6. Select the guest mode or normal mode to start the Remix OS.
Android-X86
Android-X86 is an open source project designed to port the latest version of Android to the Windows platform. Unlike the Remix OS, which mimics the PC operating system, the Android-X86 is a native Android system that is identical to the version running on the phone/tablet.
Since the native version of Android is not optimized for PCs, Android-X86 may not be intuitive enough to use. For example, checking for notifications requires you to click and drag the notification bar, and the application will occupy the entire screen – you can’t adjust the window size as you would in Remix OS.
But Android-X86 allows you to personalize Android to your liking. You can install third-party themes and main pages without worrying that they are not compatible with the system.
How to install Android-X86
1. Download the latest version of the Android-X86 image file corresponding to your computer model. If your device no longer supports the list, download the generic version.
2. Download UNetbootin.
3. Open UNetbootin and select the image file of Android-X86.
4. Select the USB stick from the list of options, click OK, and wait for UNetbootin to copy and install Android-X86 into your USB drive.
5. Restart your computer.
6. Launch to the device selection interface and select the USB flash drive.
7. Select “Install Android-X86 to Hard Disk” in the UNetbootin menu.
8. Select the partition or path where you want to install Android-X86. The program will ask if you want to format the disk. If you are not sure, choose No.
9. The program will ask if you want to install GRUB, choose Yes.
10. The program will ask if you want the system to support reading and writing. After agreeing, Android-X86 can read and write data on the hard disk.
11. Restart your computer again.
Android On Intel Platforms
Intel, the processor giant, also has its own Android version: Android On Intel Platforms. Like the Android-X86, it’s also an unmodified Android version that runs on Windows devices, giving the impression a bit rough.
There are currently only two devices supported: Intel’s NUC desktop and Dell XPS 12. The system version it uses is Lollipop, which has fallen behind two eras.
But Android On Intel also has its own attractive place. It is the easiest to install Android version and the most stable dual-system Android version.
How to install Android On Intel Platforms on your PC:
1. Download the Android On Intel Platforms installer from the official website.
2. Move the downloaded file to the USB flash drive.
3. Set the computer to boot from USB and turn on UEFI Boot Support.
4. Installation files.


